Introduction
Imagine that you are trying to map out a digital process in your company - who does what, when, and why. This is where workflow modeling comes in. It's like creating a visual roadmap of your business processes. There are many ways to model a workflow, and you should choose a method initially so you and your company can understand the process. We often use flowcharts for this type of modeling but when we collaborate with the developers it's important to be able to link the model directly to what happens in the code. The notation that we use for this is BPMN 2.0.
BPMN which stands for Business Process Model and Notation is a universal language for modeling workflows, showing the sequence of tasks, decisions, and connections between different parts and systems. This modeling approach can improve team collaboration, streamline processes, and identify opportunities for automation. Workflow modeling is a visual roadmap of business processes that can be linked directly to the code. BPMN 2.0 is a popular tool to model workflows that both analysts and developers can communicate and agree on. It helps to show the sequence of tasks, and decisions, and how different parts and systems of a process are connected, making work more efficient and identifying areas for improvement.
Tutorial of modeling a workflow: Update absence
Let's examine the example mentioned in the Theory article: The planning process for the support over the summer for a company on digital maturity level 4. To prepare for summer support, the company is going to develop a workflow called "Update absence".
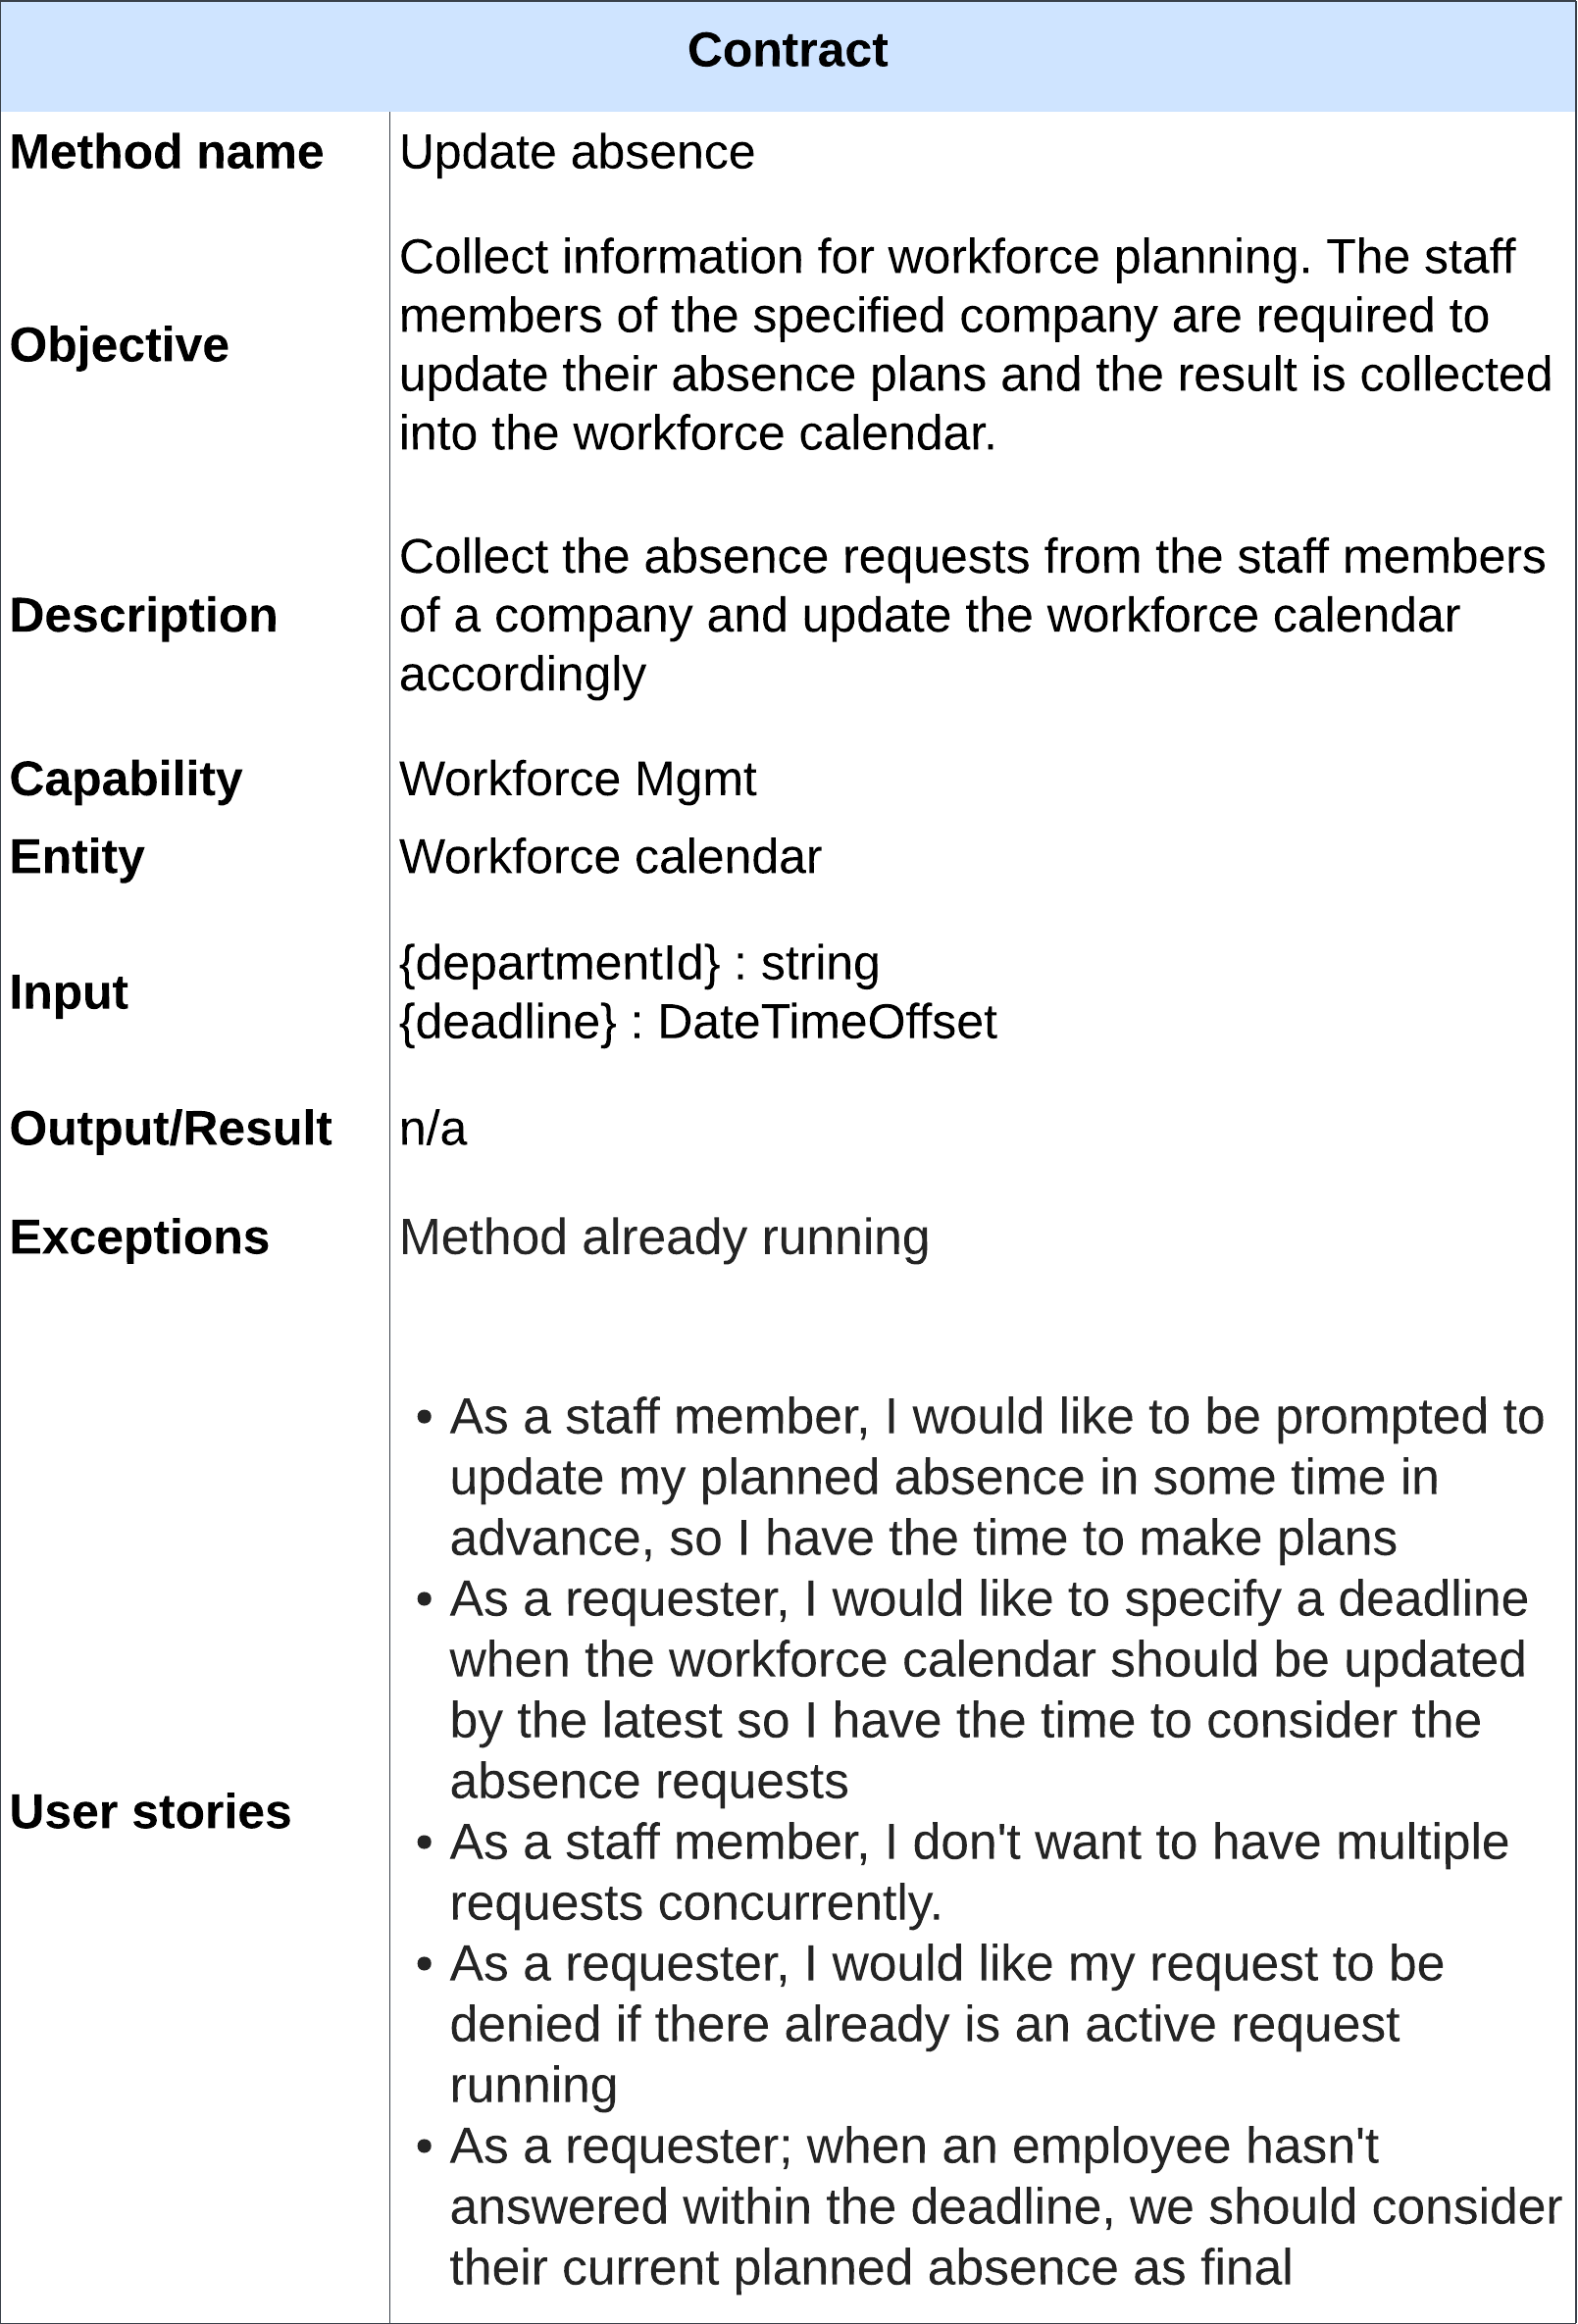
Figure 1: The contract for the method Update absence
The requirements and expectations for the method are summarized as a contract, shown in Figure 1. The contract helps you and the developers understand the needs and what is to be achieved with the method. Here is a brief description of the components of the contract:
- Method name: A method name is a unique identifier and is typically chosen to be descriptive, indicating what the method does or the action it performs.
- Objective: This is the overarching goal or purpose of the method. It tells you what the method is meant to achieve.
- Description: Provides more detailed information about what the method entails. It can add some clarifications that are not covered by the objective and the method name.
- Capability: The name of the capability where the method resides. In this example, the capability is "workforce management," indicating that this method is related to managing and organizing a company's workforce.
- Entity: Specifies the main capability entity that the method revolves around. It tells you what the central focus of the method is. In this case, the entity is the "workforce calendar," which is the key component that the method is designed to update and manage. Mark this with "n/a" (not applicable) if there is no specific entity that the method is for.
- Input: Refers to the information that the method requires to operate. This information is used by the workflow as a basis for its actions. For this method, the department Id is needed to know which staff members it concerns and a deadline for how long time the staff members have to respond.
- Output/Result: Describes what the method produces or accomplishes. In this method, there is no specific output or result mentioned because it's primarily about updating the calendar.
- Exceptions: Conditions or situations where the method may deviate from its normal operation. In this context, there is one exception: "Method already running". This means if the method is run by someone else for the same department this exception will be thrown. This is done to prevent staff members from having to update their absence several times due to multiple managers restarting the same process.
- User stories: These are statements that describe a specific user's or stakeholder's needs or desires regarding the method.
The contract describes what the method should do. The workflow describes how this method should be carried out. To implement the workflow, we'll provide a step-by-step guide that describes the activities required to produce the desired result, drawing inspiration from BPMN 2.0.
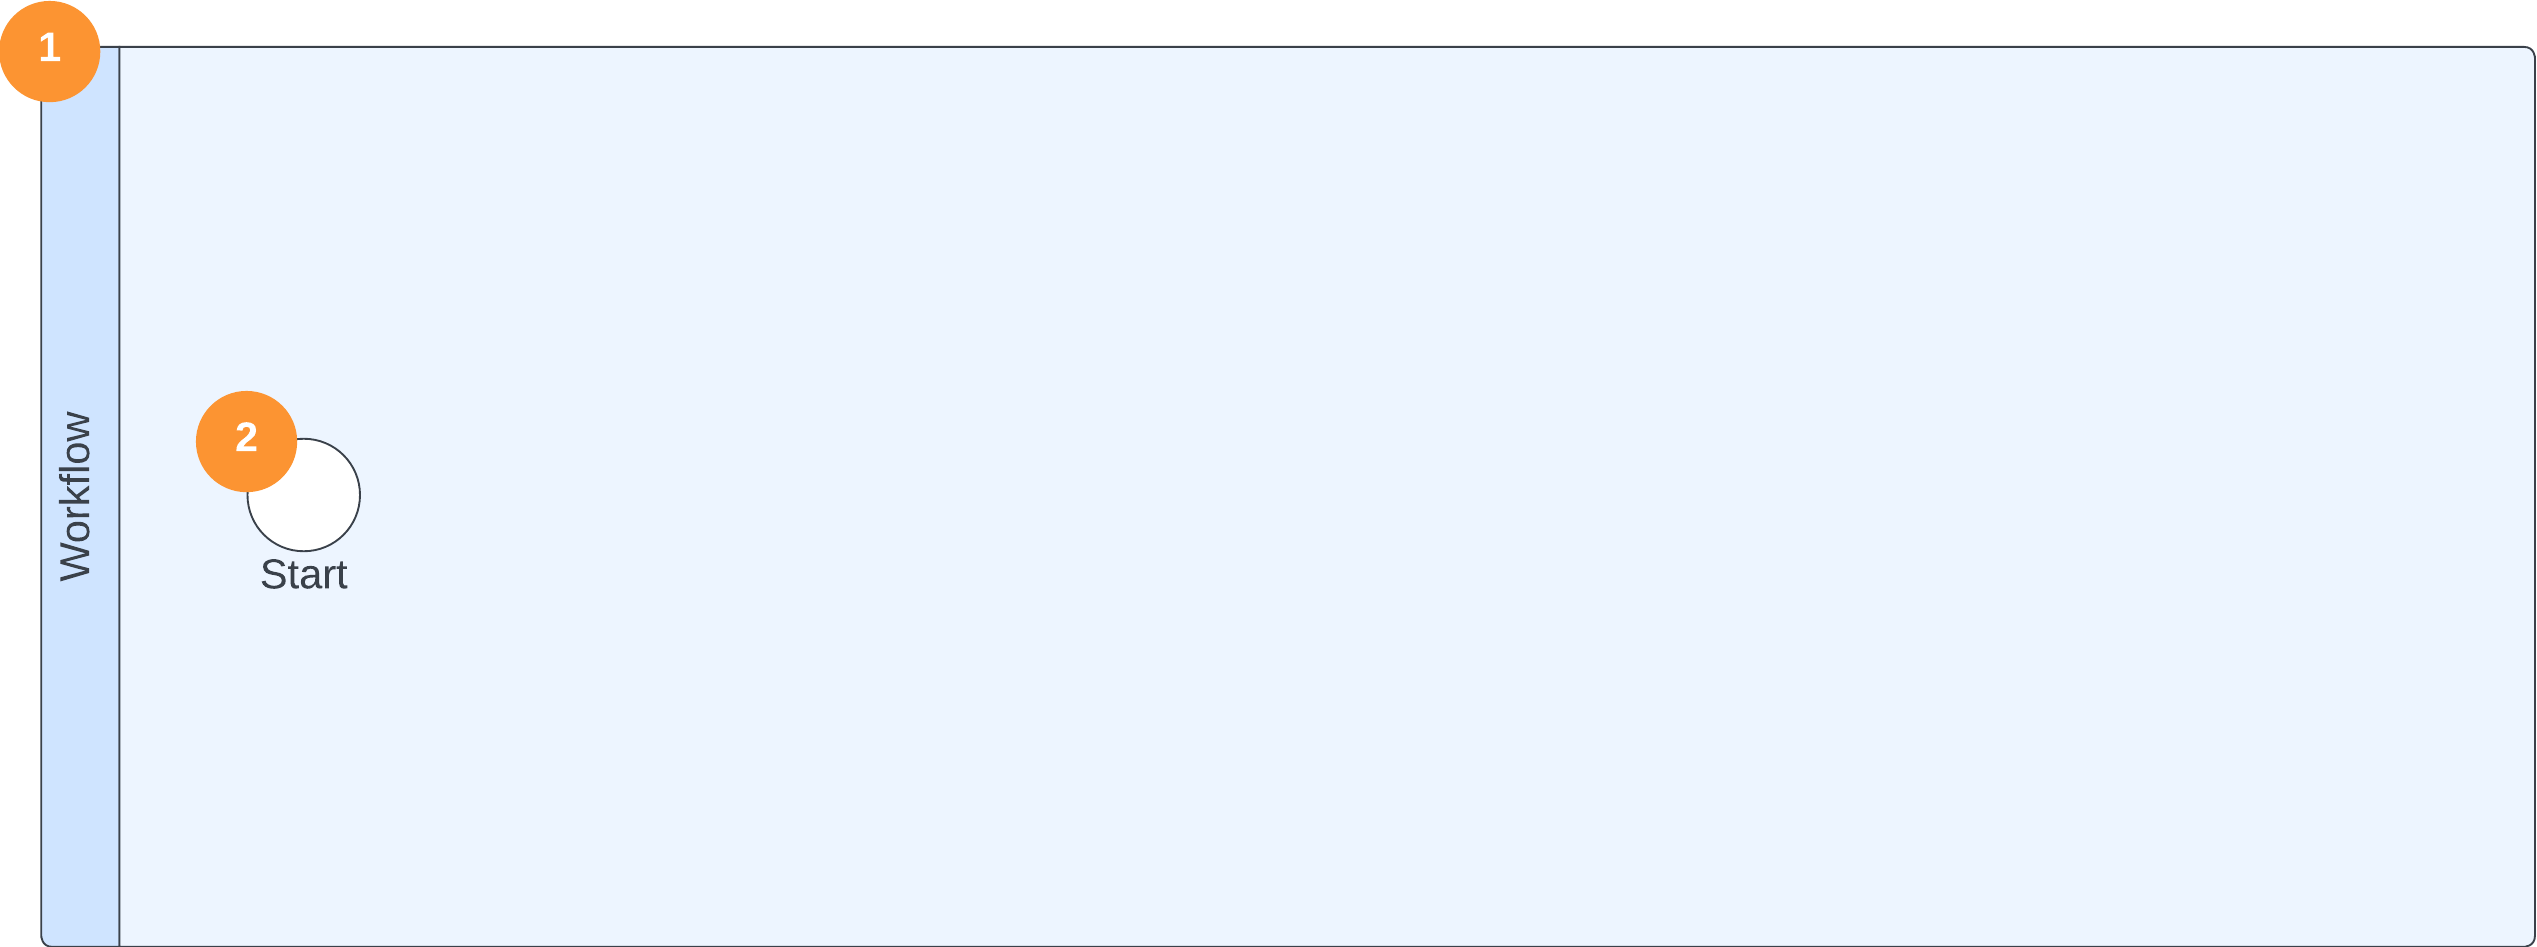
Figure 2. Steps 1 and 2 visualized in the workflow
-
We only use one swim lane for all the activities in a workflow. When we make drafts as flow charts, we often use different swim lanes for different participants, but not in our BPMN workflows.
-
To initiate the workflow, a manager asks the system to start the "absence update" process and provides a department ID and deadline as input, as specified in the contract. That specifies which department staff it affects and the time the staff has to report their absence. In our workflow, this step is represented by a start event.
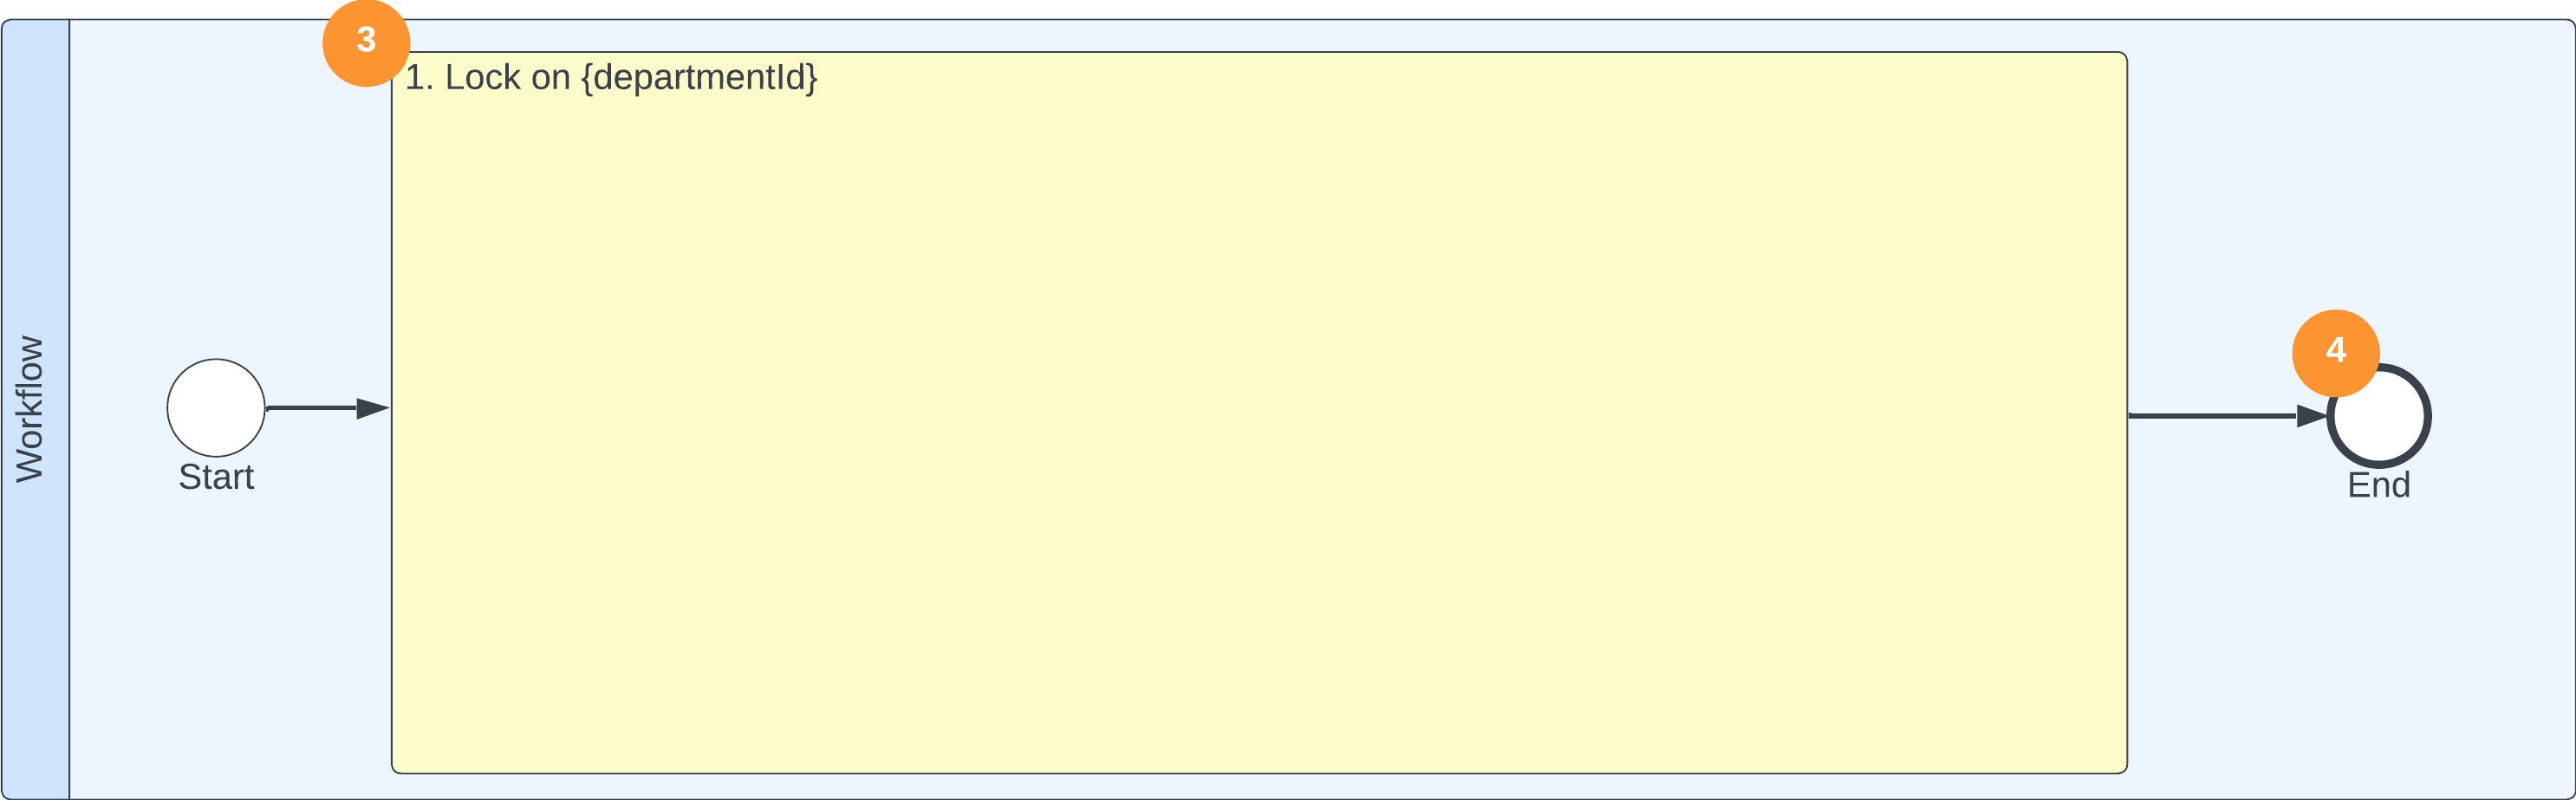
Figure 3. Steps 3 and 4 visualized in the workflow
-
When a manager starts the workflow, it will be locked to the specified department to prevent duplicate requests for absence updates. That means another manager won't be able to perform the same process for the same department. To represent the locked process, an activity is created that provides information about what the process is locked for in the upper left corner.
-
Considering the entire process, whether a manager succeeds or fails to enter the workflow, it will be part of the Lock activity. Hence, we can conclude that the workflow will come to an end after that, which we model with an end event.
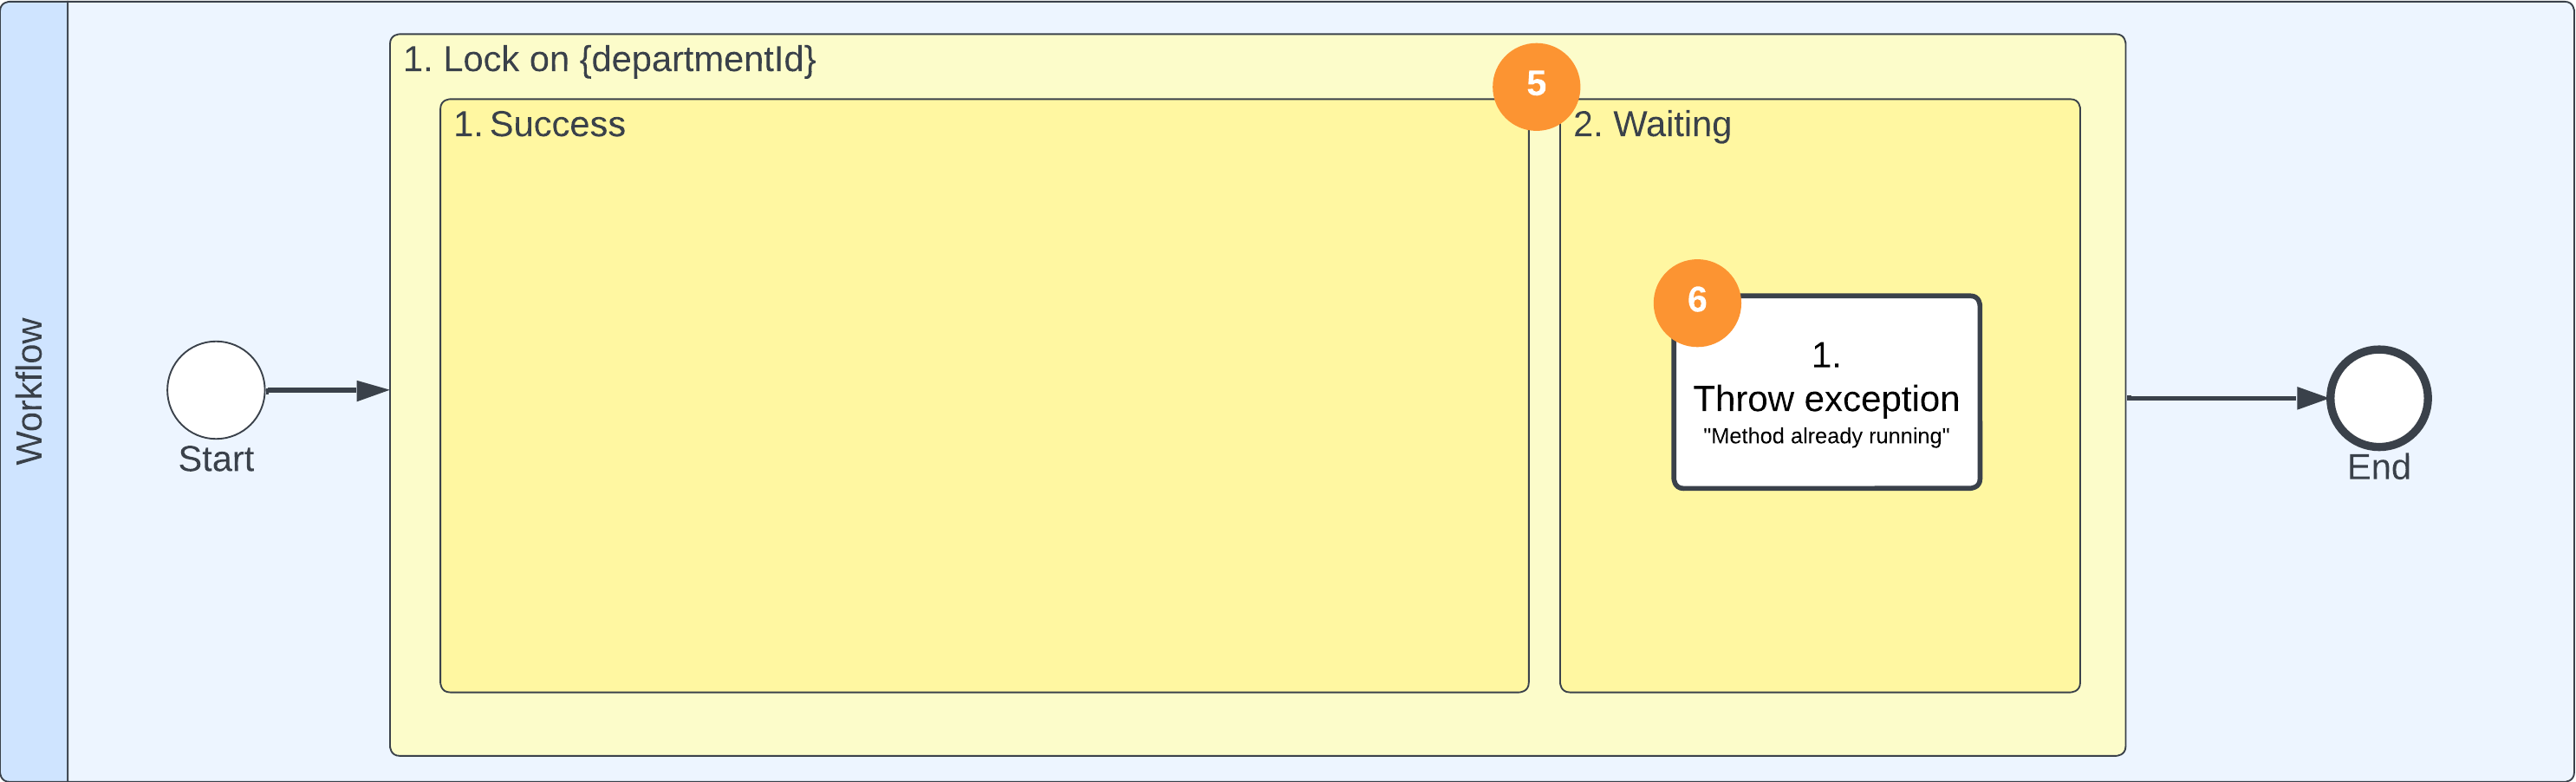
Figure 4. Steps 5 and 6 visualized in the workflow
-
The Lock activity above can have two outcomes; either the workflow succeeds in obtaining the lock or it will wait for the lock to become available. If the lock is obtained, the activities in the left option ("Success") will happen but if it already was locked the activities in the right option ("Waiting") will happen.
-
If the waiting option occurs, someone else has already started the process for the same department. We then want the current manager to receive some kind of feedback, i.e. we "throw an exception" which terminates the workflow. The program calling this Action activity has to decide what to do when this happens. Perhaps send an email to the current manager with information that the workflow is already being run for this department by another manager.
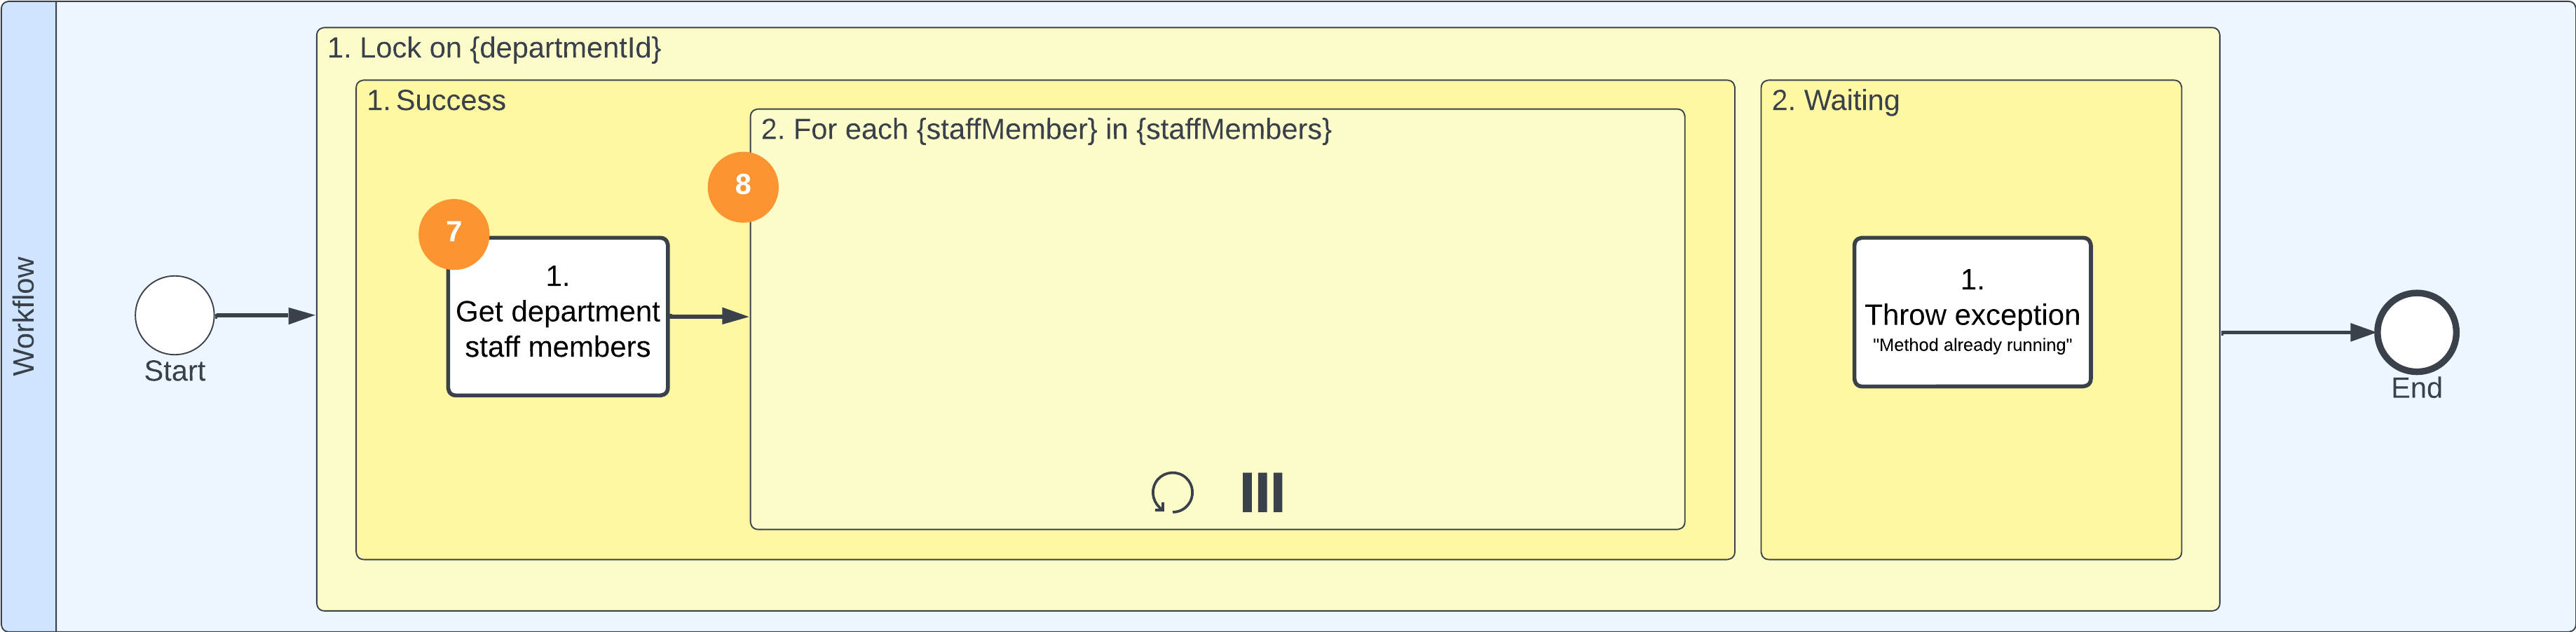
Figure 5. Steps 7 and 8 visualized in the workflow
-
When we obtain the lock, the first Action activity is to gather information by getting a list of the department staff members. To represent this Action activity, we added what BPMN calls a "call activity" element. We give it a descriptive name such as "Get department staff members" to indicate what needs to be done in this step.
-
The second activity is to go through the staff member list and complete some activities for each individual. The activities related to each staff member are grouped the activity and performed once for each staff member. This happens in parallel, which means that the activities for each staff member can occur simultaneously, rather than for one staff member at the time. Going over all items in a list is called a "loop" and it is represented by an arrow that encircles and the parallelism is indicated by three vertical lines.
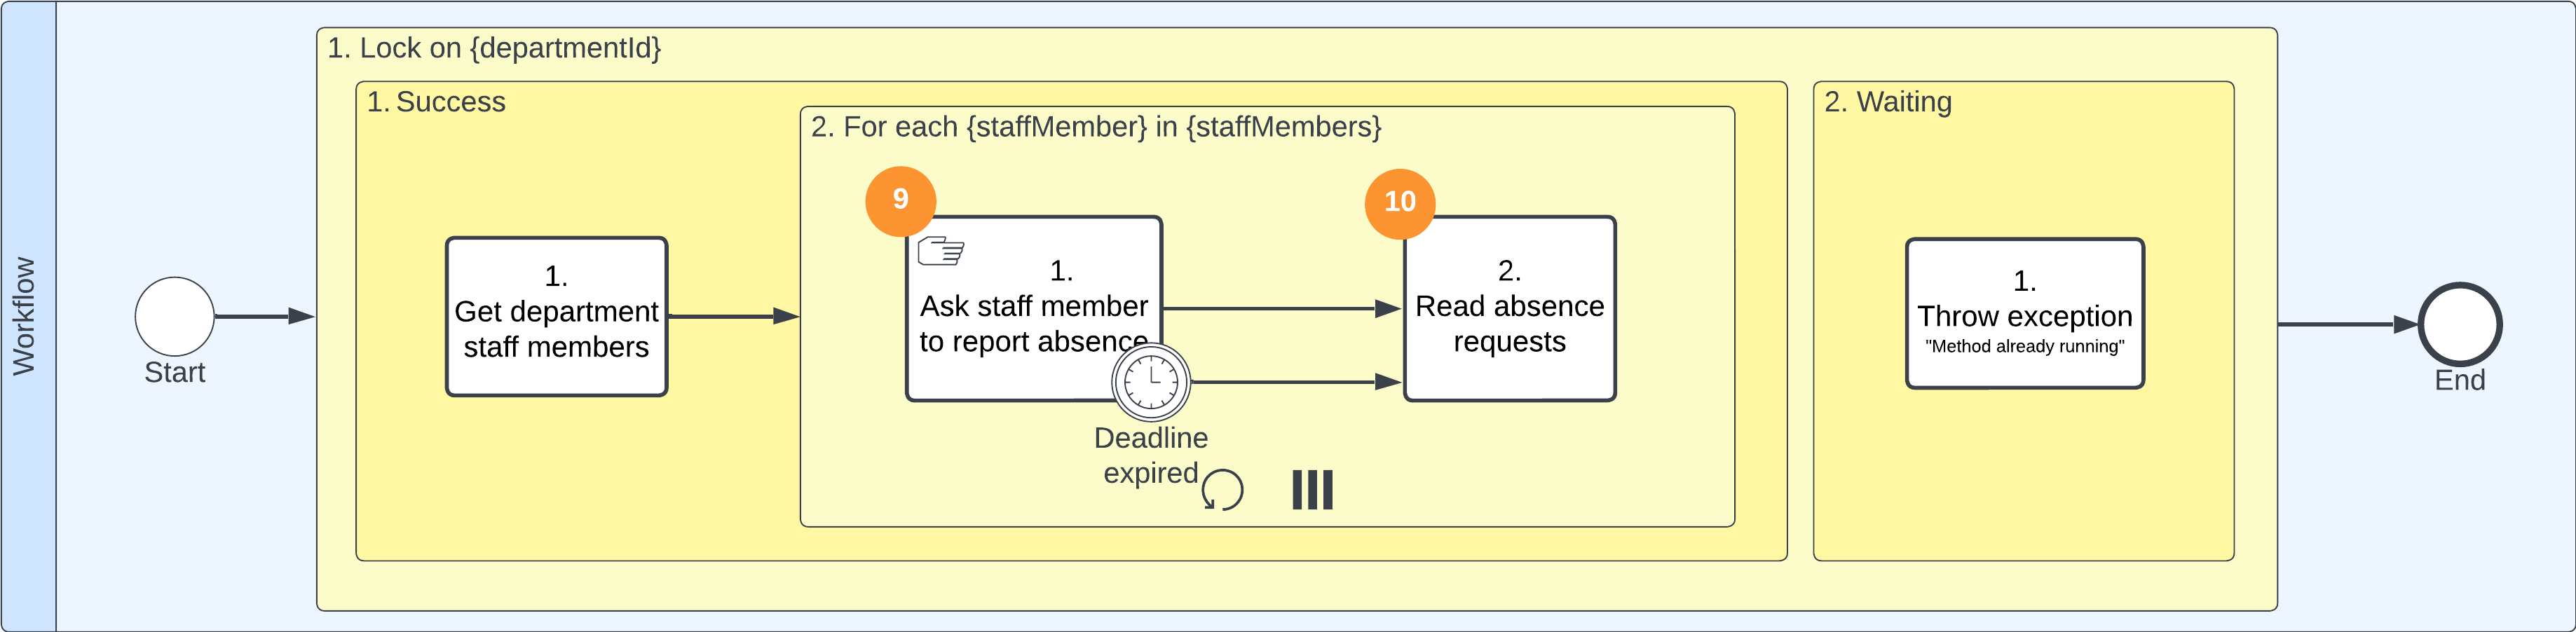
Figure 6. Steps 9 and 10 visualized in the workflow
-
The first activity in the loop is an Action activity which involves requesting each staff member to report any planned absences. This can for example be achieved by using a "Manual task fulfillment" capability that sends an email to the staff member with instructions on what they are required to do. The Action activity is marked with a hand icon to indicate that it is a manual step. Additionally, the manager has set a time limit for how long the staff member has to respond, which is represented by a clock event in the workflow.
Note 1: This Action activity has two outgoing arrows. The upper is the "normal" one, which is triggered if the activity is completed before the deadline. The lower one is triggered when we reach the deadline, i.e. we will leave this activity even if it is not completed by the staff member.
Note 2: The "Manual task fulfillment" is responsible for sending out reminders.
-
The next activity is an Action activity that gather all the absence requests from the staff member. In this example we expect them to enter that into a common tool where we now can programmatically fetch the answers. Keep in mind that a staff member can have multiple requests, such as wanting to take two weeks of vacation in June and two weeks in July. All those requests from the staff member should be included in their list.
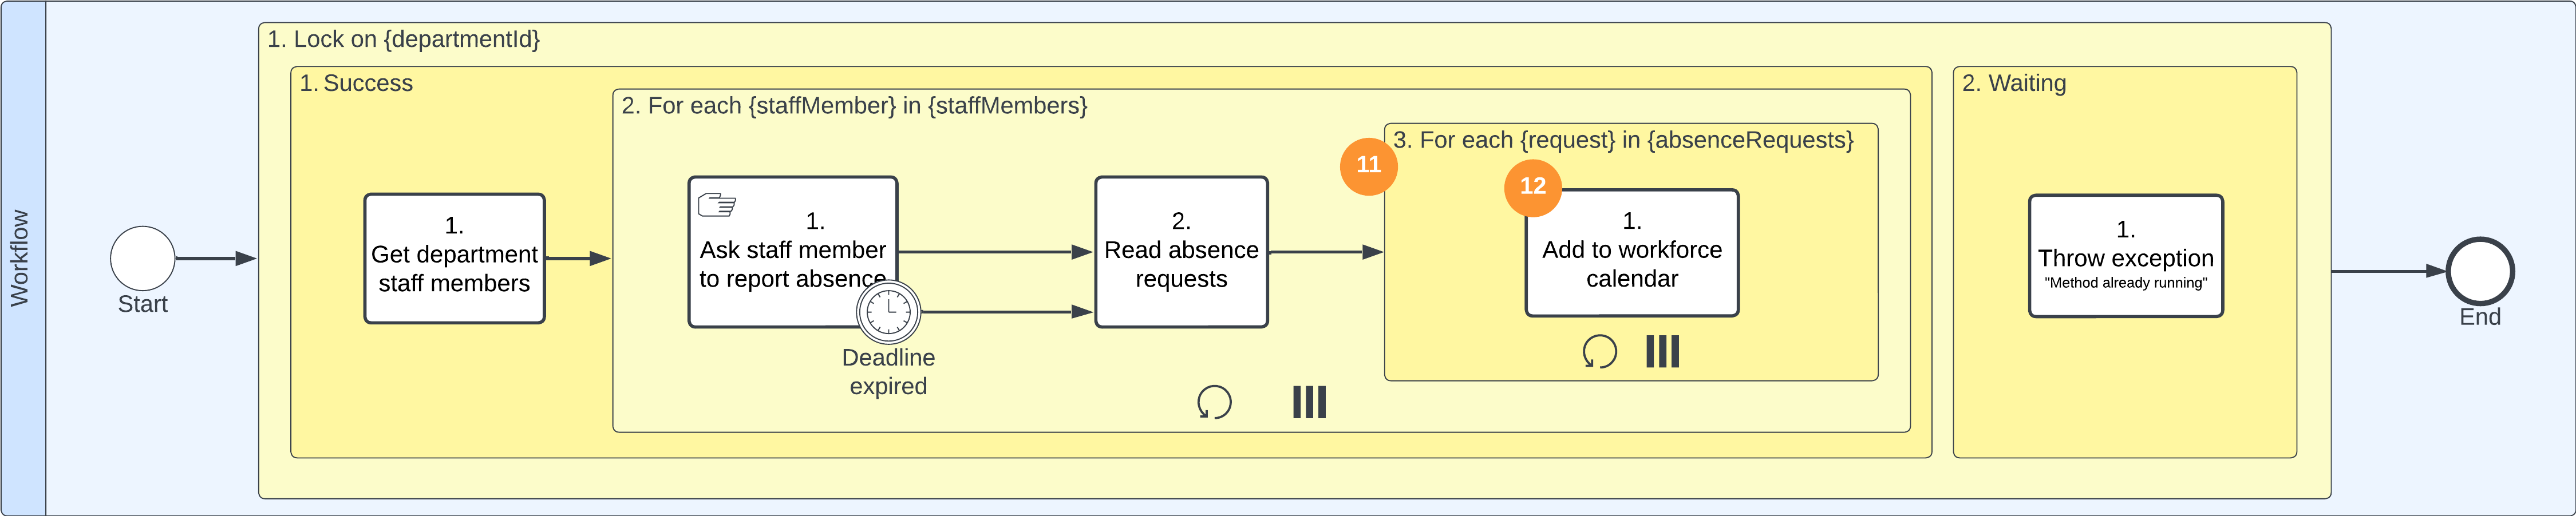
Figure 7. Steps 11 and 12, which are the last steps that together visualize the entire workflow
-
To process each absence request from the staff member, the system needs to go through their requests one by one. This activity occurs in another loop, executed in parallel for each request until all requests have been processed. Similar to step 8, this is represented as an activity with a loop symbol and a parallel symbol.
-
The only activity in the loop is an Action activity; to add the absence requests to the department's shared workforce calendar.
When all the activities have been completed for all the staff members of the department, the workflow is complete.
Now we are done with the modeling of the workflow! In the article Coding a workflow, we will explain how this workflow is translated into code.